Saturday, May 7, 2016

New useful additions!

In my previous post I mentioned the mainframe instrument I purchased.  I had another run of luck on eBay and was able to purchase a few more pieces.  I was able to obtain at 2 channel scope and a 102 channel logic analyzer card.

The oscilloscope card has good specifications: 2 channels, each with a 2 GS/sec 8 bit analog to digital converter. Each channel is capable of 500 MHz Bandwidth.  The logic analyzer card is capable of 500 MHz timing and 100 MHz state analysis with 102 channels.  The new configuration is shown in the picture below.

Current Configuration
The initial oscilloscope card tests were done using my function generator hooked up to both channels with the same signal function output.  In the screenshot below, you can see the 3 MHz sin waves shown on both channels.

Function Generator Scope Trace


I decided it to test out the new cards using an FPGA development board I have laying around.  I set up the design logic to output 16 signals for logic analysis as well as clock outputs for the scope channels.  A picture of the board setup to test the instrument cards is below.
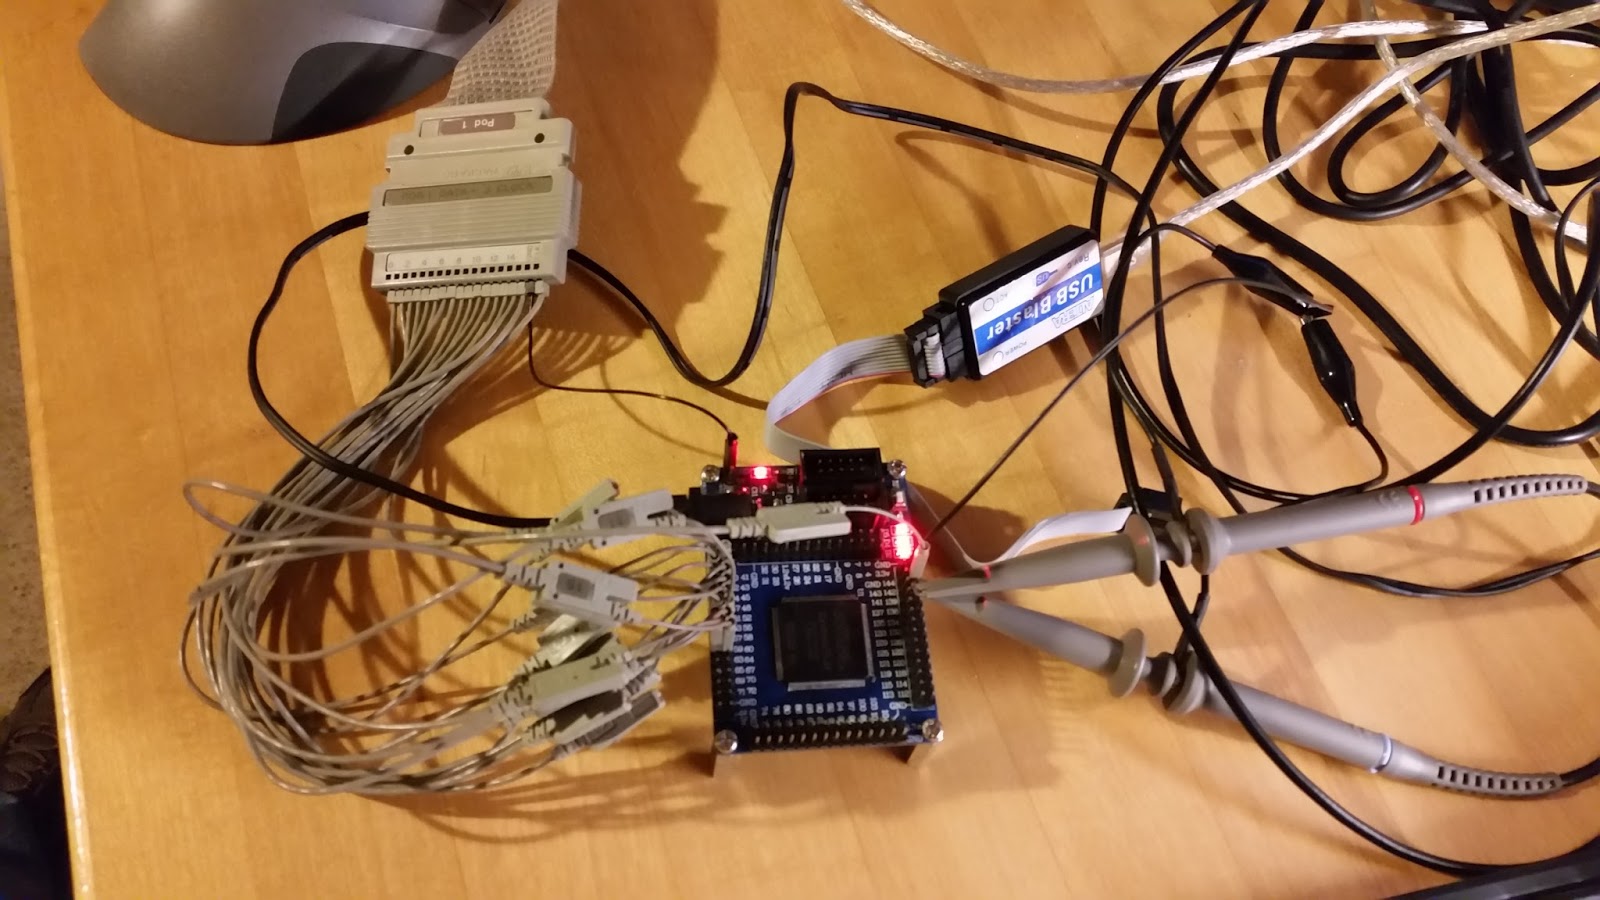
Test Setup

I hooked up one of the flying lead pods up to the logic analyzer cable, then to the pins on the FPGA development board.  The oscilloscope probes and logic analyzer clock input line are connected to clock output pins as well.   I wrote some simple VHDL to synthesize some signals to test the logic analyzer and to output the clock signals.  The screenshot from the oscilloscope below shows that the clock output is 50 MHz.

FPGA Scope Trace

The clock signal isn't super clean and you would want to use a Schmitt trigger to clean that up before using it to drive something.  At least we can verify that the 50 MHz clock going into the FPGA can be forwarded out of the FPGA.  

The logic trace is very busy as you can see below.  The labels on the left side designate which pin on the FPGA development board the leads are connected to.

FPGA Logic Trace

The next thing for me to tackle is to figure out how to setup an inter-module trigger and run that as a group.  I know this will be useful in the future with some up coming projects.  Have fun everyone, see you next time.


Saturday, April 30, 2016

A new piece of equipment!

I have been looking for a piece of equipment that is like a mixed signal oscilloscope, but more configurable, accurate and has a good price.  I was loosing hope when  I stumbled upon a used logic analyzer mainframe chassis on eBay while researching.

I noticed that the HP 16500 series mainframe, particularly the C model was exactly what I was looking for.  I began searching eBay frequently and doing research on the card configurations I was interested in.  Friday last week, I saw a C model chassis with the exact set of cards I was looking for and bought it.  The mainframe arrived Just yesterday!  Here is a picture of it below:


HP 16500 C
The mainframe actually came with a 4 GHz Timing / 1 GHz State logic analyzer card and the matching expansion card for it.  If you are using all 32 channels it will drop to 2 GHz timing mode.
The 4 GHz timing mode is enabled for 16 channels though, which is amazing.  The best thing about this is that I was able to buy it with all the pods as you can see below.


Logic Pods

The system software loaded to the hard drive also includes the symbol utility, which when combined with the inverse assembler is very powerful indeed.  Bill Buzbee used the inverse assembler and a HP Logic Mainframe to debug his homebrew CPU Magic!

There are still 3 more empty slots in the mainframe, I plan on getting a few more cards to allow me to cross trigger scopes and a pattern generator.  You can connect the C model to the local area network via a cat 5 cable.  This allows you to FTP into the machine and transfer files, mount the device as an NFS share, TELNET into it and give it direct commands, or even connect to the console via X Windows as a client.  The current configuration of the mainframe is visible in the picture below.

Current Configuration

I decided to test out the logic analyzer and pods on a current side project.  Below you can see what the waveform view from the logic analyzer looks like.

Waveform Screen

That's all for now, have fun everyone!

Saturday, March 19, 2016

MIPS Development board!

The other day I found a MIPS based development board and I knew I needed one.  I have loved the MIPS instruction set for a long time.  I bought a Creator Ci20 development board, which can be found at Imagination's web store.  I have found that most of the references to this board talk about Linux or Android, but I want to do bare-metal and work with real time operating systems on this board.

One brave developer embarked on a bare-metal project, which he hopes to get back to when he can. Nicholas's posts are listed out in his blog post: The CI20 bare-metal project.  His posts are really good and a great starting point into working with this board.  This is where I will start working from, reading his posts and building from his knowledge.  Thank you very much Nicholas for your project and detailed posts.

This being said, I grabbed crosstool-ng (latest version is 1.22) and built the mips-unknown-elf tools to work with the board in a bare-metal fashion.  First you must install crosstool-ng, then you use that to automatically build your tool chain.  If you want a list of the supported tool chain samples call crosstool-ng with the list-samples command: ct-ng list-samples.  This will print out a list of all the supported tool chain configurations it knows how to build.  I knew I wanted mips-unknown-elf, so I called crosstool-ng with the following command: ct-ng mips-unknown-elf and it built a configuration for the bare metal MIPS tool chain.  Finally, you tell crosstool-ng to build the tool chain for you with the following command: ct-ng build.  I left this to go about it's business while made myself a little adapter board.


The pin out for my existing TTL Serial converter don't match the board's pin out for the dedicated UART header. I don't want to continually reconnect jumper wires from the converter to the board.
I finished this, to notice that the tool chain was completely built, I think I now love crosstool-ng!
The tool chain appears to work, gcc complained about no input files, and gdb informed me that it was compiled to target mips-unknown-elf.


I have the tool chain, adapter for my TTL Serial converter, power adapter and Ethernet cable ready, I can plug it all together and power up the board.


I still need to: 
  1. Create a Bitbucket repository to store the code for this project.
  2. Setup the build system.
  3. Setup Doxygen to generate documentation.
  4. Setup a TFTP server to allow me to boot the board off development code easily.
  5. Setup scripts for build process to copy the image automatically to the TFTP location.
  6. Test to make sure board will boot the image from TFTP.

Saturday, March 5, 2016

Syntax files for UltraEdit on Linux

I wanted to make sure that the wordfiles used by UltraEdit on my workstation were up to date.
I am sort of lazy sometimes and really get tired of copying them from the website and placing them in the folder.

As it turns out IDM Computer Solutions uses github to handle the storage of it's wordfiles for UltraEdit, this is great.  On Linux, when you install UltraEdit the default wordfile directory is ~/.idm/uex/wordfile.

I went to the directory above the wordfile directory, ~/.idm/uex and removed the wordfile directory and then cloned the repository from IDM using the following command:
git clone https://github.com/IDMComputerSolutions/wordfiles.git.

Now, when I start up ultra edit it has all the syntax files available.  The real bonus now is that all I have to do is do is go to the wordfiles directory and do a git pull, to get the latest wordfiles.

Tuesday, January 26, 2016

My cscope and ctags setup

Along with my .vimrc setup, I typically use cscope and ctags to navigate around a tree of source code.  I typically setup two bash scripts to separate searching from generation of the files.  This way,
I can generate the search files for a large source tree only if I have to.

The first file I make is the update.sh script:

>------------------------------------ Start of Contents ------------------------------------<

#!/bin/bash

#   Remove all existing files that we use to search
rm -rf *.files *.out tags

#   Build all the tags
ctags -R --c++-kinds=+p --fields=+iaS --extra=+q ../.

# find all files for cscope to process
find ../. -name "*.c" -o -name "*.cpp" -o -name "*.s" -o -name "*.h" > cscope.files

#   Generate lookup and reverse lookup databases

cscope -b -q -k

>------------------------------------ End of Contents ------------------------------------<

Then I make the search.sh script:

>------------------------------------ Start of Contents ------------------------------------<

#!/bin/bash

#   Tell Cscope to use gvim ( this will allow multiple files to be open )
export EDITOR=gvim

#   Search with the just built databases
cscope -d


>------------------------------------ End of Contents ------------------------------------<

I keep these scripts in their own directory in a source tree, and work from that directory.
The directory tree is set up like this:


These scripts are setup to go up one directory from cscope directory, and then recursively build a list of .c,.cpp,.s and .h files so that they can be used by cscope to build a lookup database file and a reverse lookup database file.  This speeds up the searching on larger code bases (like the one I use at work).  

Hopefully, this will help someone besides myself.  Have fun.

Saturday, January 23, 2016

My vim / gvim config file

I finally took the time to recreate the .vimrc like I use to have a while ago.  I am posting it here so I don't lose it again, maybe you will find some of it useful.

>------------------------------------ Start of Contents ------------------------------------<

" Set to automatically read when a file is changed from the outside
set autoread

" Always show current position
set ruler

" Configure backspace so it acts as it should act
set backspace=eol,start,indent

" Ignore case when searching
set ignorecase

" When searching try to be smart about cases
set smartcase

" highlight search
set hlsearch

" incremental search
set incsearch

" Don't redraw while executing macros
set lazyredraw

" Regex Magic
set magic

" Extra margin to the left
set foldcolumn=4

" Turn on folding
set foldmethod=syntax

" Enable syntax highlighting
syntax enable

" show partial commands
set showcmd

" display line numbers
set number

" Color Scheme
try
 colorscheme desert
catch
endtry

set guifont=Hack\ 10

set background=dark

" utf8 encoding as en_US default
set encoding=utf8

" Unix file as the standard file type
set ffs=unix,dos,mac

" No backup etc
set nobackup
set nowb
set noswapfile

" Use spaces not tabs, and be smart about it.
" 1 tab = 4 spaces
set expandtab
set smarttab
set shiftwidth=4
set tabstop=4

" Use actual tabs for makefiles only!
autocmd Filetype make   setlocal noexpandtab

" Auto, smart indent
set ai
set si


" Set Window Size
set lines=50 columns=132


>------------------------------------ End of Contents ------------------------------------<

And a picture of what it looks like while viewing  C files:


Sunday, October 4, 2015

MOS Development Start

This weekend I got a little bored, and decided to start up operating system development again.  There is a video of MOS running at the end of the post;
I know, it's been a while.  Firmware development is pretty similar anyway (they both use cross-compilers and have almost nothing in the way of library code.  Originally I bought the HP 530S desktop machine in the video for OS development testing.  I figured I would have a go at making MOS boot on the test machine.  Well, here is an overview.

I have the following directory structure setup:


The functionality provided in my build setup so far:
  • documentation
  • object dumps
  • size of kernel
  • building the kernel
  • rebuilding the kernel
  • cleaning
  • updating the floppy image
I am using (of course) standard Linux tools:
  • gcc
  • nasm
  • ld
  • objdump
  • doxygen
  • size
  • make
  • cscope
  • ctags
  • perforce

Compilation has pretty clean output (when stuff goes right, anyway) :


The output isn't that bad when stuff goes wrong either:


Bochs does a pretty good job of running MOS for debugging / testing quickly:


I have already found the CPU Register window helpful in debugging:


I am also starting to really become a fan of the doxygen generated documentation, this just looks fantastic:


Last, but not least, here is the video I promised at the start of the post.